

Installation Tips and Key Points for Making CAN'BRICK & CAN'STONE Look Sharp
Have you ever installed brick or manufactured stone veneer only to end up with a finish that looks unmistakably “tiled”? Or found yourself unsure how to plan the layout in the first place? With just a few key points in mind, you can get a finish that looks dramatically closer to real brick or stacked stone.
In this column, we’ll walk you through the key points for making CAN’BRICK brick tile and CAN’STONE stone veneer look like a professional installation.
Table of Contents
Basic Layout for CAN’BRICK Brick Tile
How to Finish Inside Corners and Openings for CAN’BRICK Brick Tile
CAN’BRICK Brick Tile Pattern Laying and Corner Installation Points
Price Difference for Pattern Laying — How Much More Does It Cost?
Finishing the Perimeter of CAN’STONE
Summary
Basic Layout for CAN’BRICK Brick Tile — Start by Paying Attention to the Joints!
What matters most when installing brick tile is how you handle the joints. A joint is the seam that forms between tiles, and its width and alignment completely change the overall impression.
To achieve a texture close to real brick, each piece of CAN’BRICK has slight variation in size. This is exactly what gives it an authentic look, but it’s also what makes planning the layout tricky.
So here we’ll use two CAN’BRICK product lines with larger dimensional variation — ones that tend to cause the most trouble when planning a layout — as examples!
■ Horizontal Line Layout
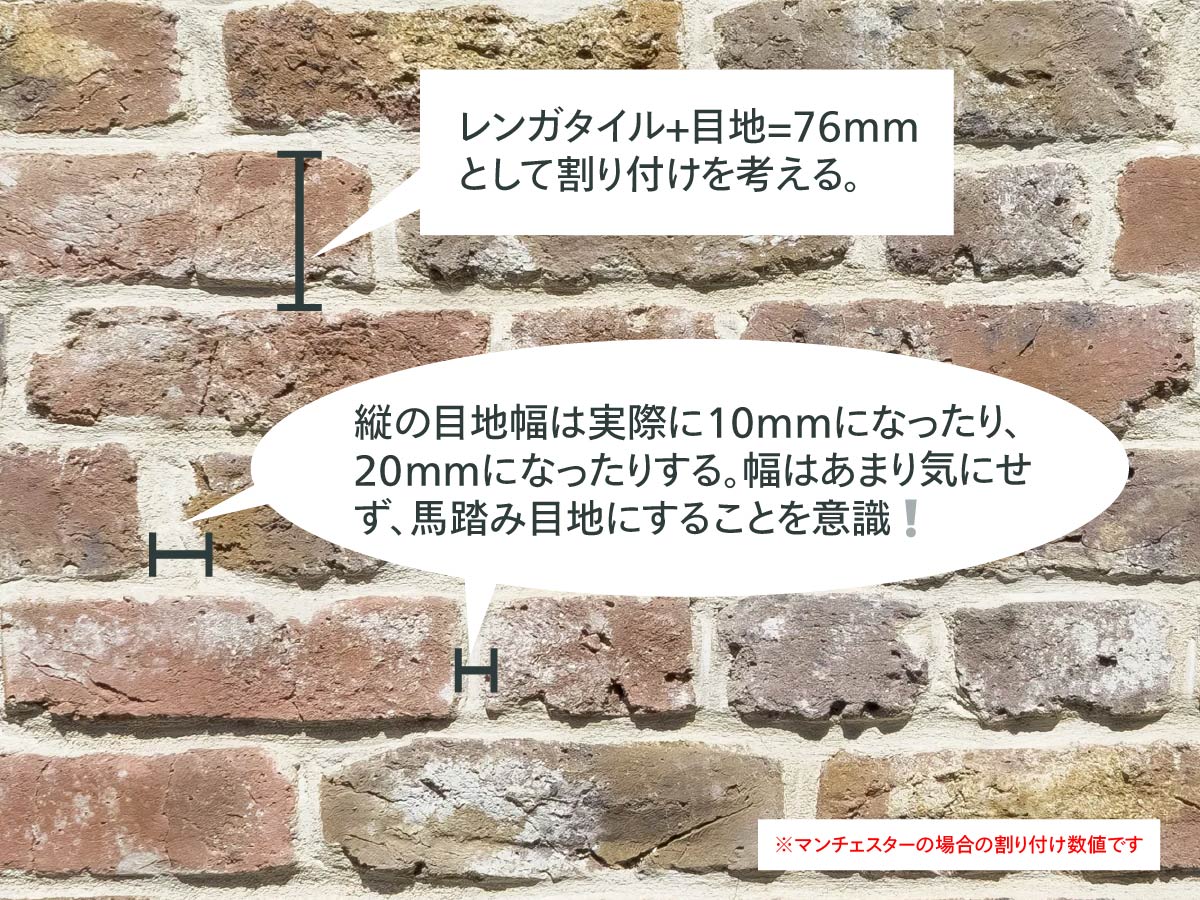
●CAN’BRICK Manchester (MC) Layout
For Manchester, calculate the horizontal line layout using approximately 76 mm per course as a guide.
For example,
4 courses: 76mm × 4 = approx. 304mm
8 courses: 76mm × 8 = approx. 608mm
That’s the basic idea.
Using this dimension as your baseline to work out “how many courses fit” against the height of the wall you’re installing makes it much easier to plan your layout.
*What Is a Running Bond Joint? Read More Here
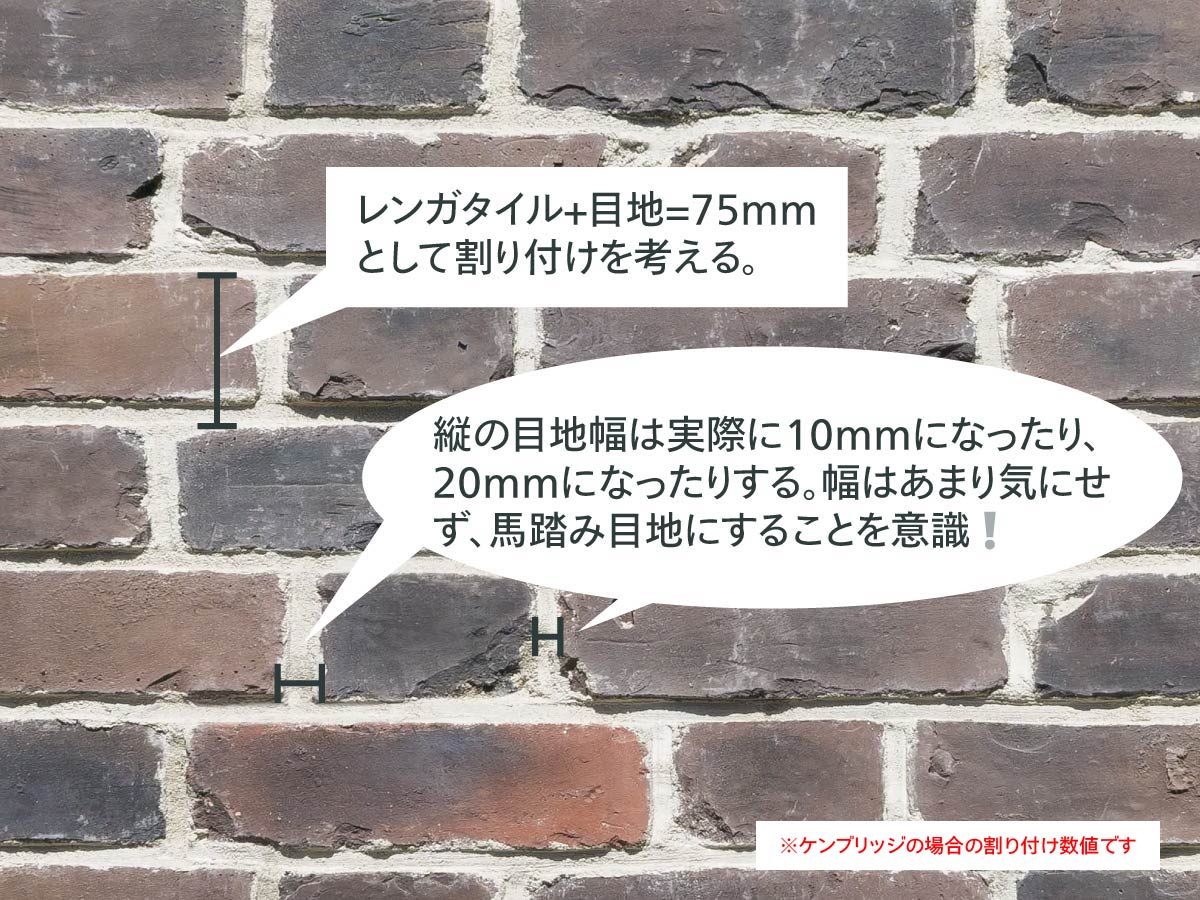
●CAN’BRICK Cambridge (CB) Layout
For Cambridge, calculate the horizontal line layout using approximately 75 mm per course as a guide.
For example,
4 courses: 75mm × 4 = approx. 300mm
8 courses: 75mm × 8 = approx. 600mm
That’s the basic idea.
Using this dimension as your baseline to work out “how many courses fit” against the height of the wall you’re installing makes it much easier to plan your layout.
What’s the Calculation Behind This?
The layout dimensions are calculated from the average tile size and the joint width.
Here we’ll use Manchester as an example.
The Manchester brick tile has a vertical dimension of roughly 60–80mm. For the actual layout, we account for this size variation and use approximately 65mm as the average guideline dimension.
For the joint width, we assume approximately 10–12mm, averaging to approximately 11mm.
In other words,
Tile approx. 65mm + Joint approx. 11mm = approx. 76mm per course
That gives us the total.
As a result,
4 courses: approx. 304mm, 8 courses: approx. 608mm
and these are the figures we use for the layout dimensions.
Cambridge is calculated the same way, based on the average tile size and joint width.
■ Vertical Line Layout
For the vertical line (vertical joints), being too strict about the joint width can make the lines wander. In practice, vertical joint widths tend to come out around 10, 16, or 20mm, but rather than fixating on an exact width, adjust by eye while keeping the running bond pattern (offsetting the joint lines like a staggered ladder) in mind.
■ What About Layout Dimensions for Other Product Lines?
For layout dimensions on any other product lines, please feel free to contact our sales department.
We’ll check and get back to you with the details!!
Note 💡
The substrate dimensions on site take priority, but feel free to adjust flexibly to suit your preferences as well.
CAN’BRICK Brick Tile Inside Corners — The Joint at the Corner Changes the Look
The inside corner of a building is a spot where the joint treatment can dramatically change the overall impression.
Good example: The joints alternate at the inside corner
Bad example: The joints line up in a straight line at the inside corner
Real brick is laid in a staggered pattern, so the joints naturally alternate too. Offsetting the joints the same way with brick tile makes it look far more authentic ✨
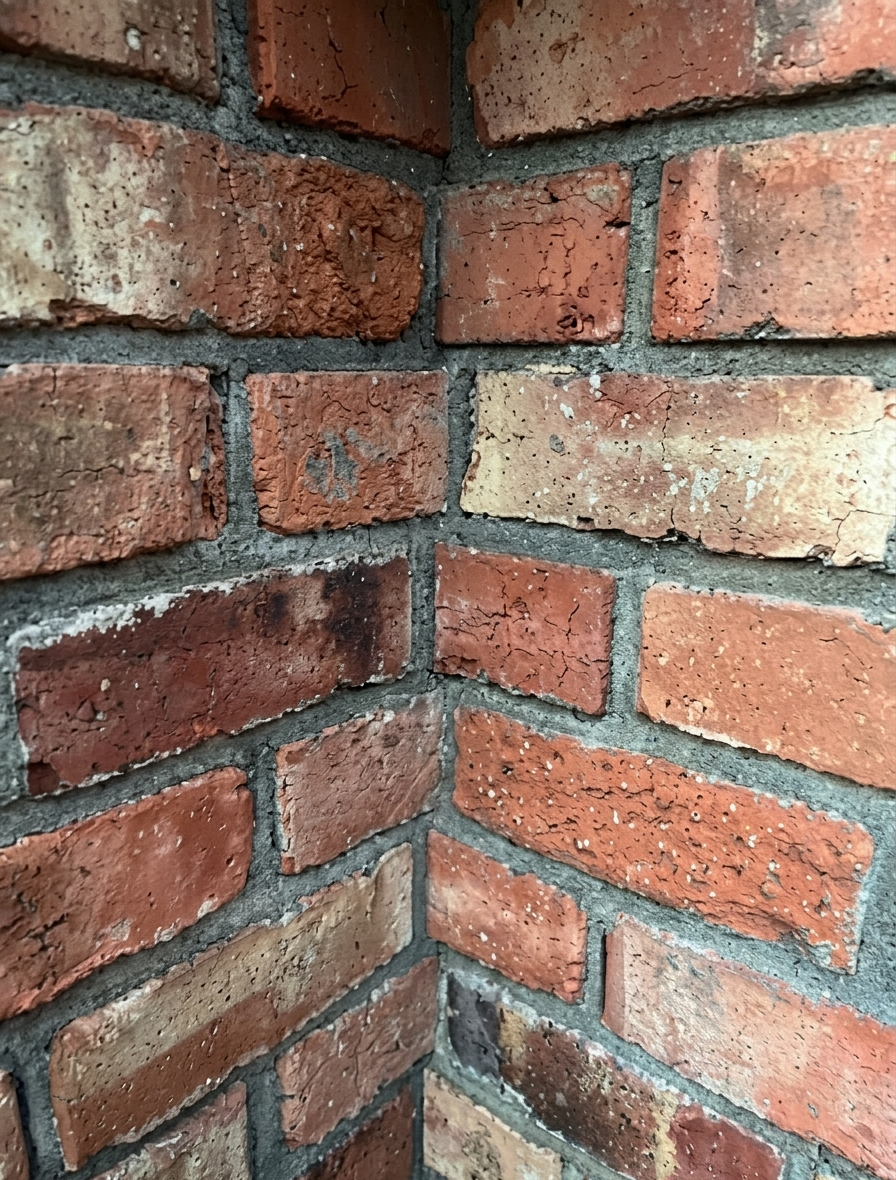
Good example ⭐️
The joints at the inside corner alternate
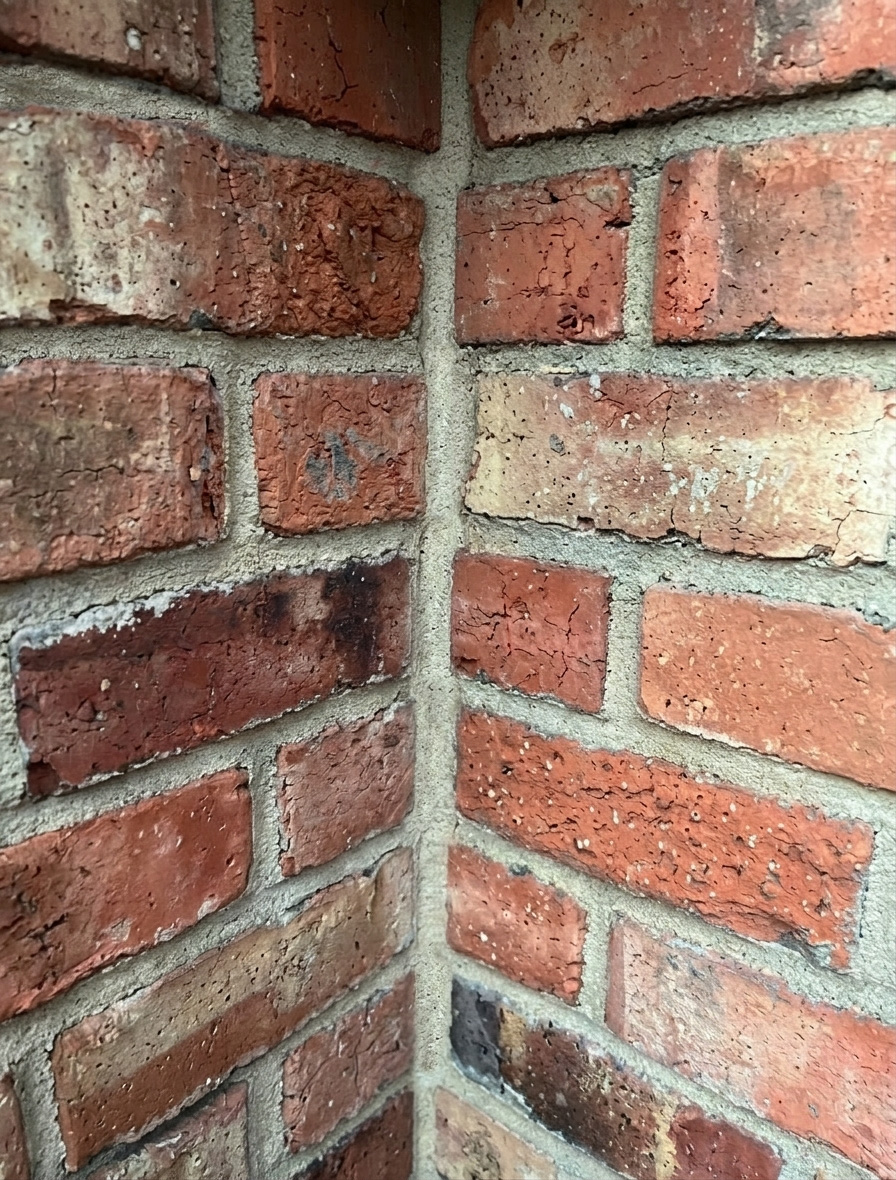
Bad example ❌
The joints at the inside corner form a straight line
CAN’BRICK Brick Tile — Above and Below Openings
The areas above and below windows and doors draw the eye, so how they’re finished matters a great deal.
POINT 💡
Never use a size that real brick could never come in.
During installation, a slight gap will inevitably turn up somewhere. It’s tempting to cut a tile down thin to fill it, but if you end up with a sliver so small that real brick could never come in that size, it will look unnatural. Keep the mindset of “real brick would never be cut this thin” in mind.
Read More on Designer Patterns for Openings
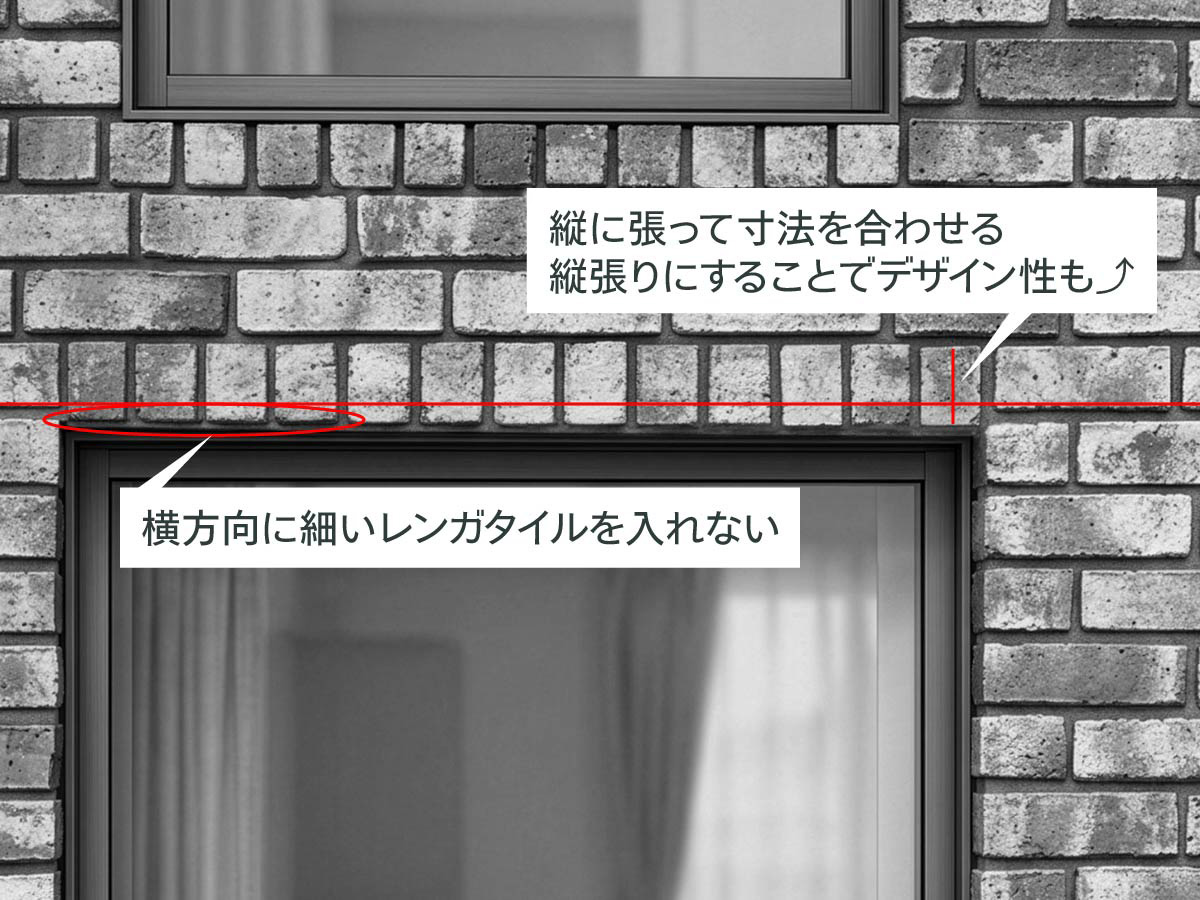
CAN’BRICK Brick Tile — Sides of Openings: A Slightly Uneven Joint Line Is Fine
The same goes for both sides of windows and doors — pay attention to how the joint lines run.
Good example: A slightly uneven joint line is fine
Bad example: Forcing the joints to line up perfectly and ending up with an extremely thin sliver of tile
The harder you try to make everything line up perfectly, the more likely some distortion will show up somewhere. Embracing a slight offset as part of the natural character ends up looking more beautiful overall.
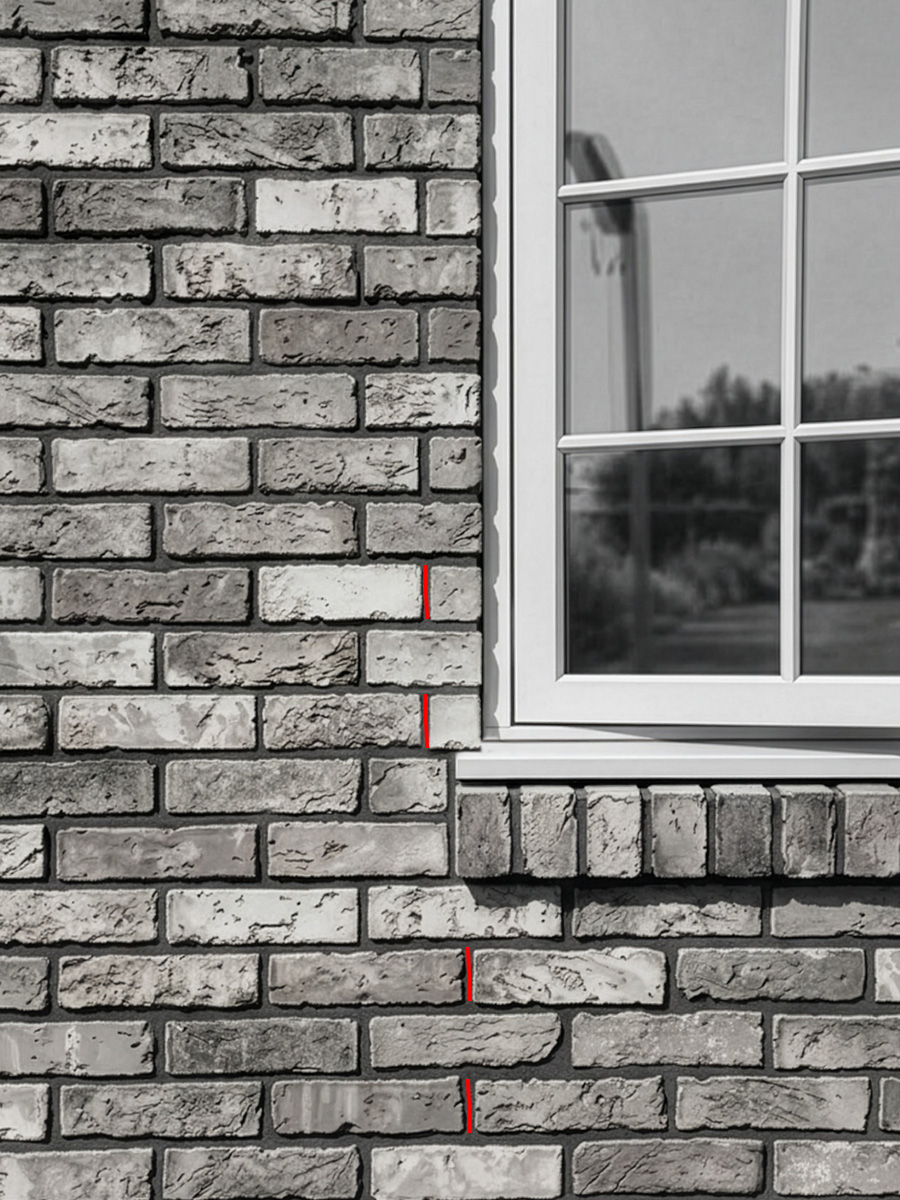
Good example ⭐️
Offsetting the joint keeps overly thin slivers of brick tile from being needed
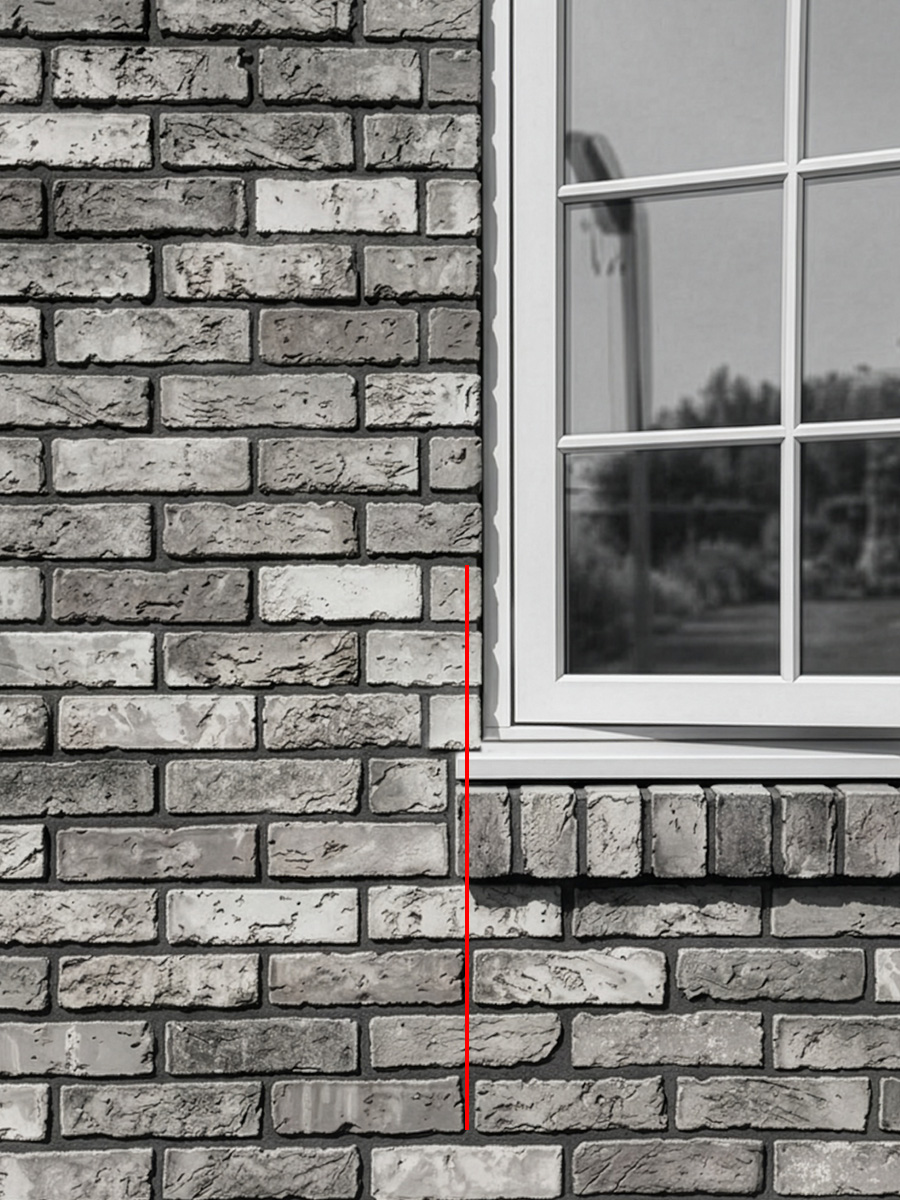
Bad example ❌
Trying to align the joints results in overly thin slivers of brick tile around the window
CAN’BRICK Brick Tile Pattern Laying — Mix “Flat” and “Half” Shapes for a More Stylish Look⦸️⦸️
Pattern laying is a technique that mixes Flat and Half shapes together. With the CAN’BRICK series, this pattern laying instantly gives you a more authentic brick look and boosts the design appeal!
Here we’ll cover installation points beyond the standard running bond pattern.
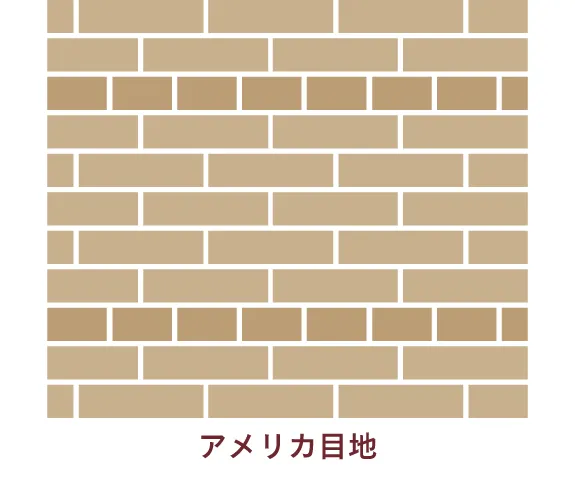
A pattern that repeats 5 courses of Flat plus 1 course of Half as one set.
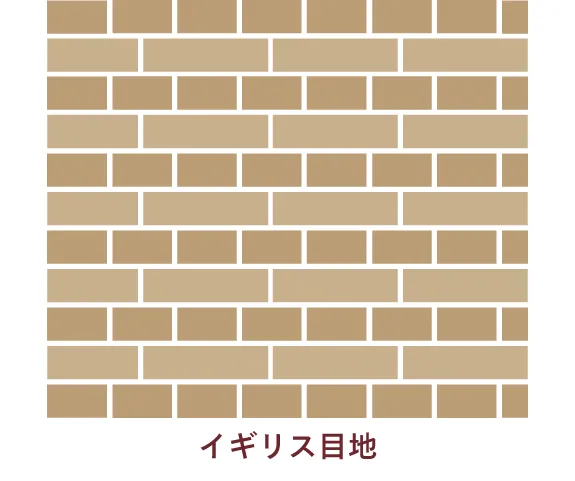
A pattern that repeats 1 course of Flat plus 1 course of Half as one set.
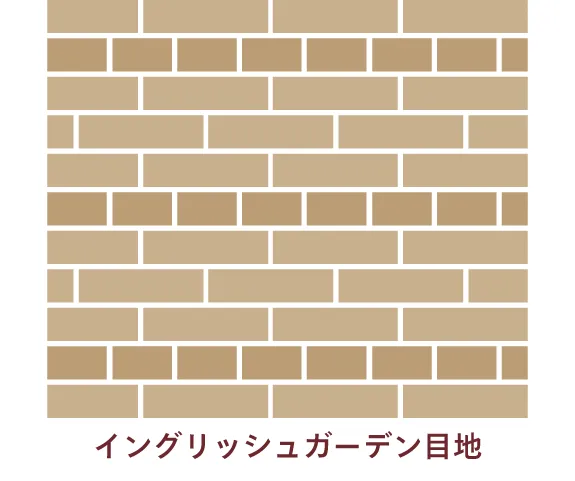
A pattern that repeats 3 courses of Flat plus 1 course of Half as one set.
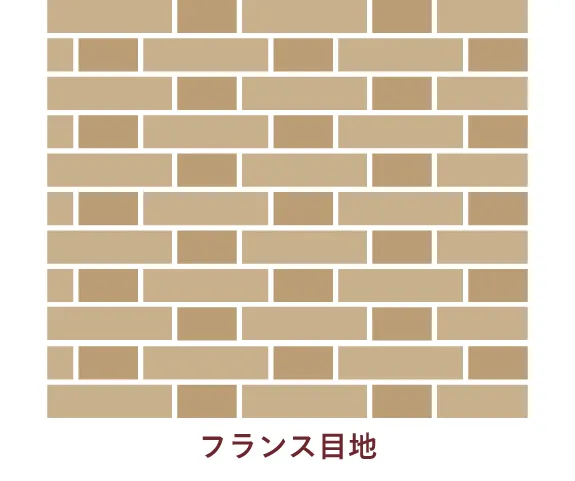
A pattern that alternates Flat and Half horizontally in a repeating row.
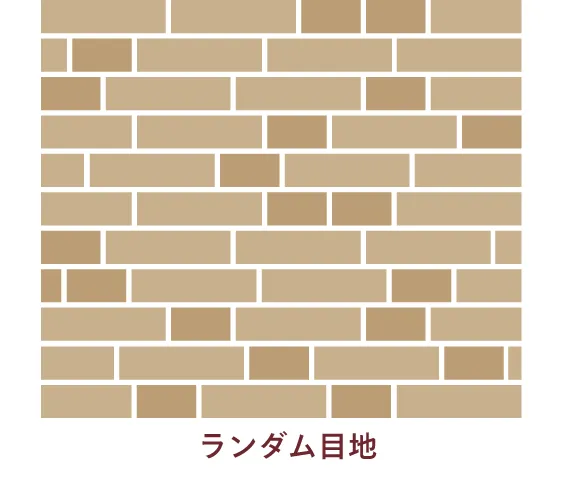
A pattern that arranges Flat and Half pieces randomly.
POINT 💡
A mix ratio of around 15% Half to Flat is recommended. Example: for 100m2, that’s 85m2 Flat + 15m2 Half
Arrange Flat and Half irregularly, following the image above as a guide.
Rather than the “half offset” used in a standard running bond, lay the tiles with a “quarter offset.”
●Key Point! How to Finish the Corners
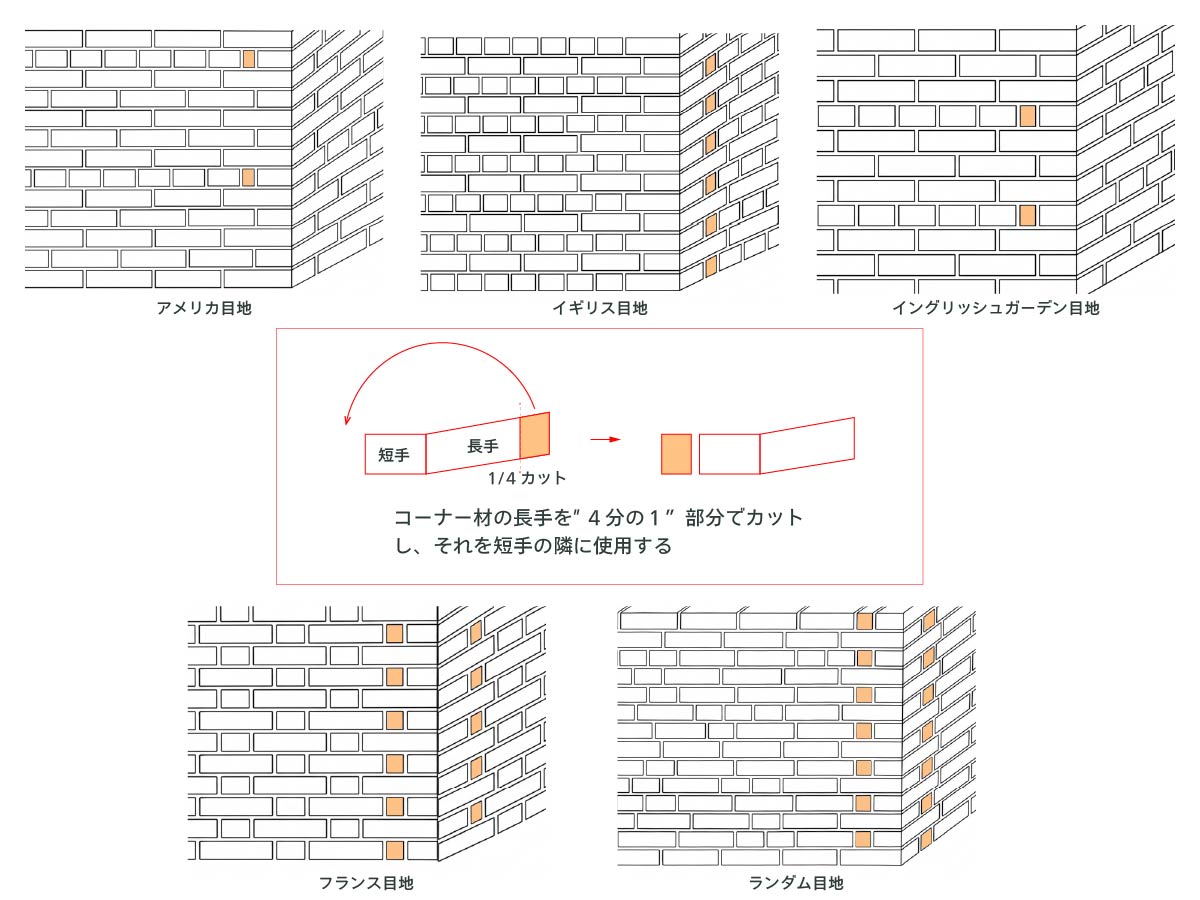
Bad example: Having the vertical joints run in a straight line is a no-go. It ruins the effect of the pattern laying, so always be sure to offset the joints.
Price Difference for Pattern Laying — How Much More Does It Cost?
Here’s a reference table answering the question, “How much more expensive is pattern laying compared to the standard running bond?”
Pattern Name | Flat : Half | Mix Ratio | Price Diff. vs. Running Bond |
American Bond | 5:1 | 17% | 1.4–4% |
English Bond | 1:1 | 50% | 4–10% |
English Garden Wall Bond | 3:1 | 25% | 2–5% |
French Bond | 2:1 | 33% | 3–7% |
Random Bond | 1:0.18 | 15% | 1.2–3% |
Random Bond has the smallest cost difference and the most natural look. If cost-effectiveness is your priority, Random Bond is the one to choose!
Installation Points for the Perimeter of CAN’STONE
With CAN’STONE (stone veneer), how you handle the perimeter — the edges — is what really makes it look professional.
Edges without trim: It’s best not to force-cut the stone veneer — use it as-is
Inside corners: Don’t cut the stone veneer. Run the joint all the way through to the inside corner
Leaving the edges rounded gives a natural rock-face texture, resulting in a finish that looks just like real stacked stone.
●Trim Areas
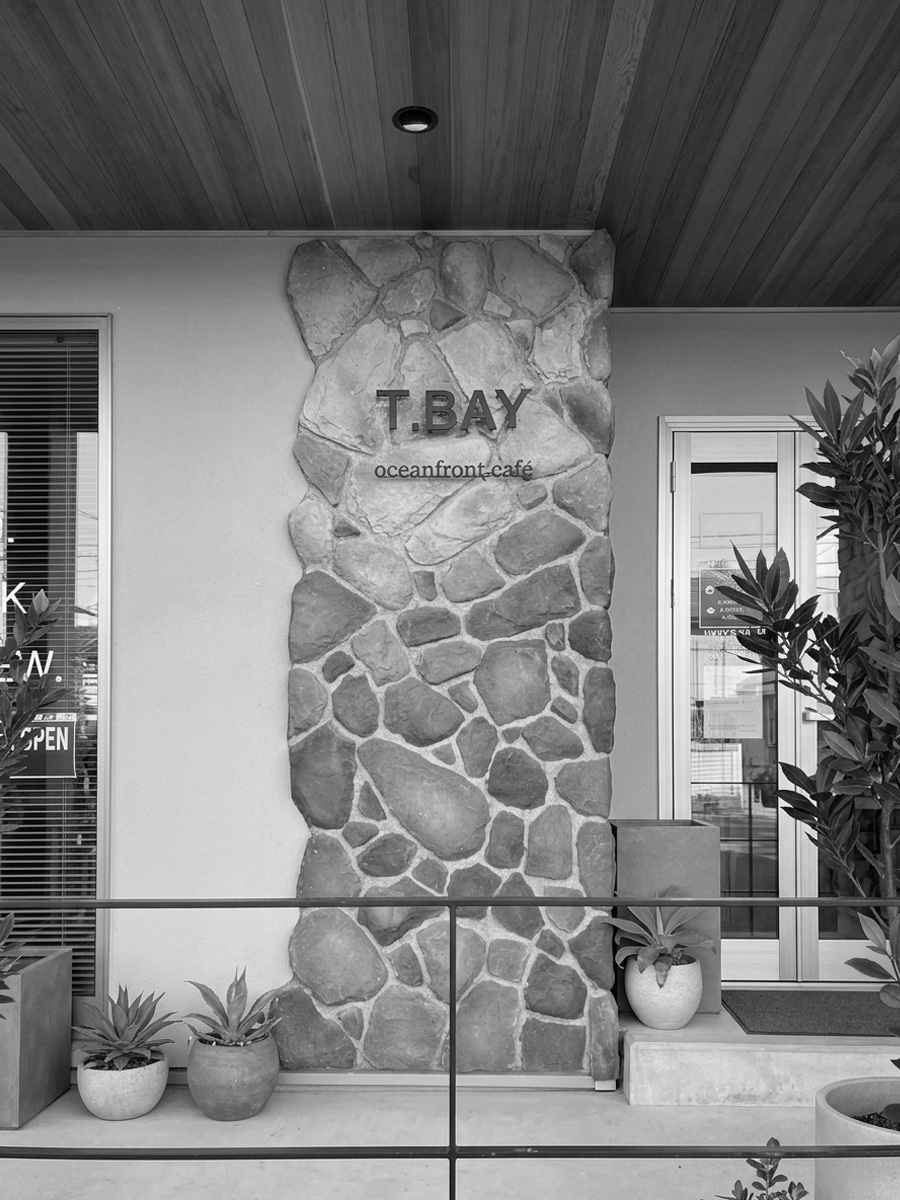
Good example ⭐️
Use the stone veneer’s natural shape without cutting
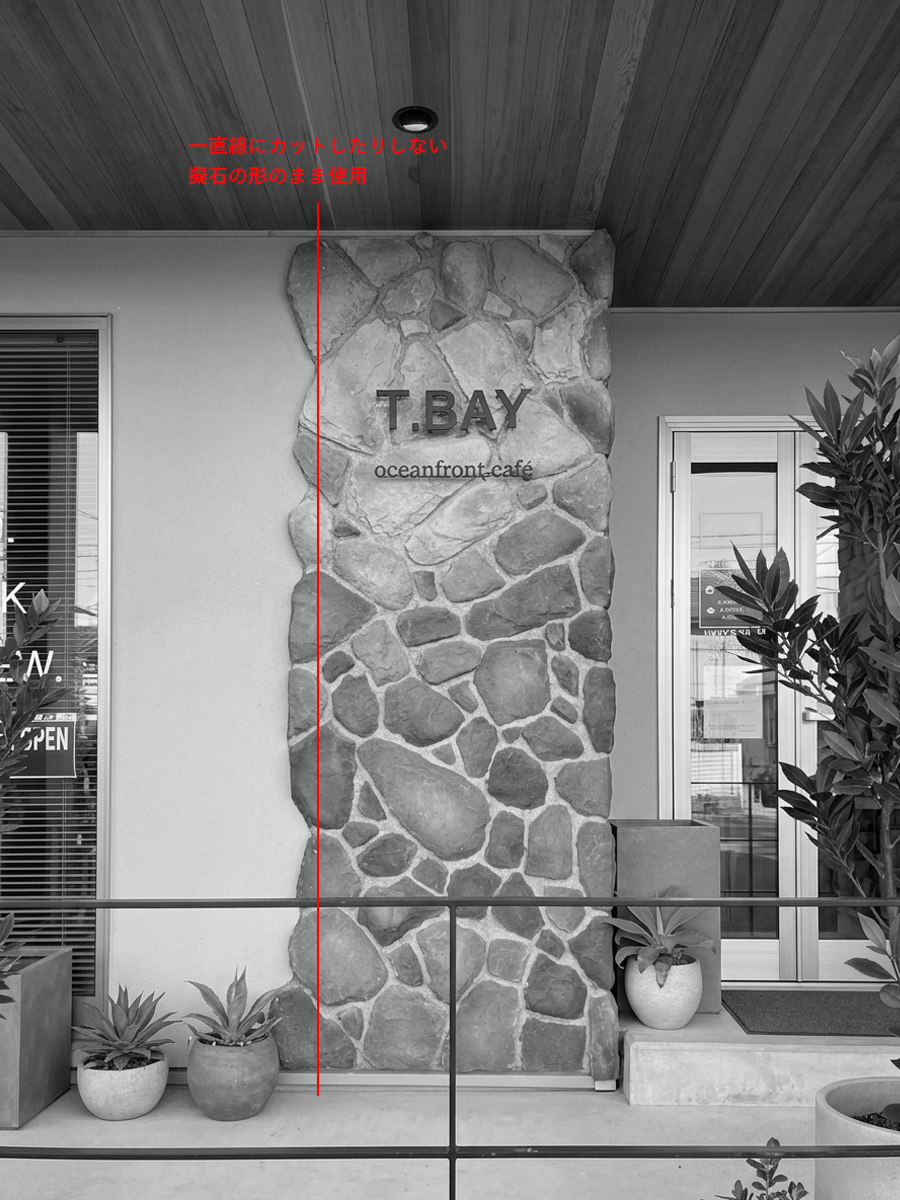
Bad example ❌
Cutting along the red line to even out the edge is a no-go
●Inside Corners
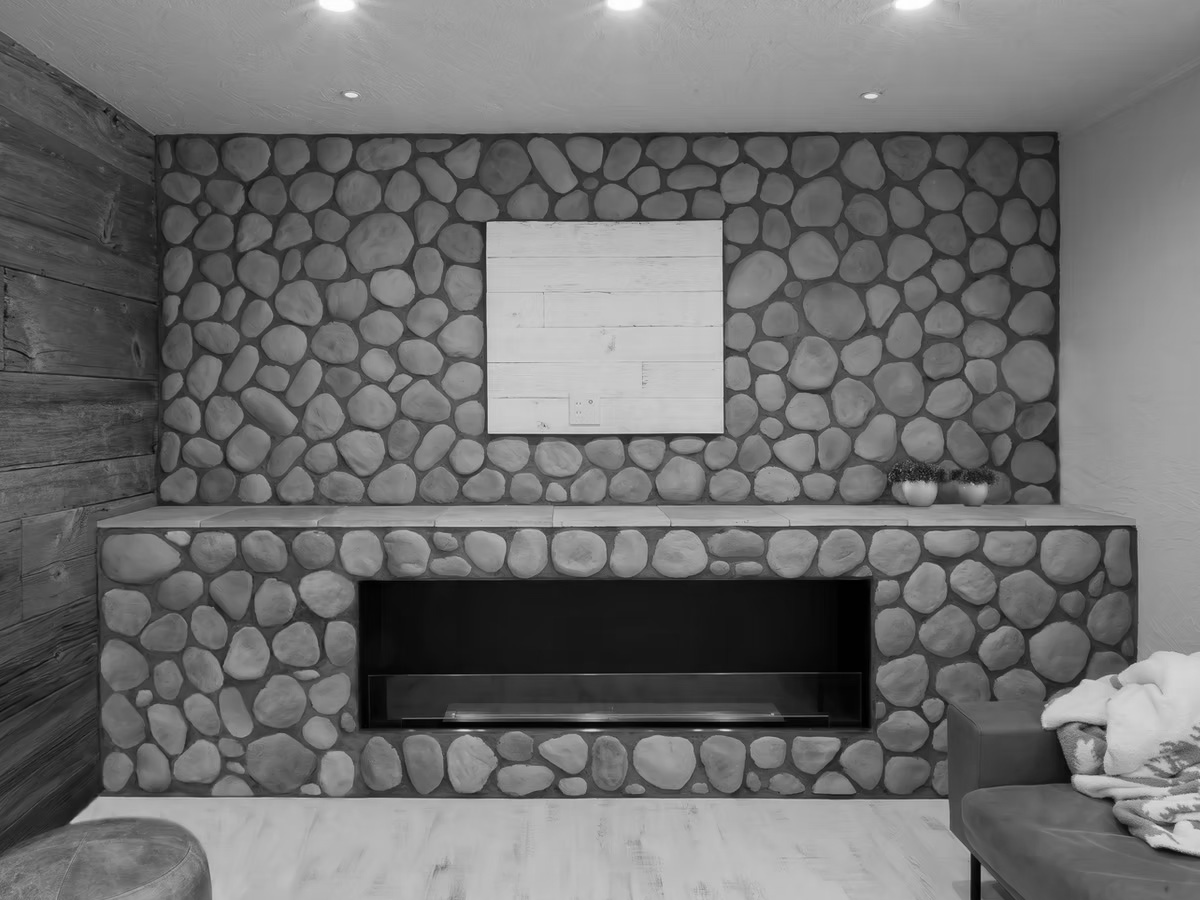
Finish inside corners without cutting the stone veneer. Run the joint all the way to the inside corner.
Summary — The Watchword Is “What Would Real Brick or Stone Do?”
The single biggest tip for making it look sharp is simply to imagine **“What would happen if this were built with real brick or stone?”**
Once you’ve got these points down, even a DIY project can get close to a finish that looks like real brick or stacked stone. Give CAN’BRICK & CAN’STONE a try for the exterior or interior look you’re going for ✨
Latest Articles
View All
Notice of Price Revision for MT-MEJI Joint Filler
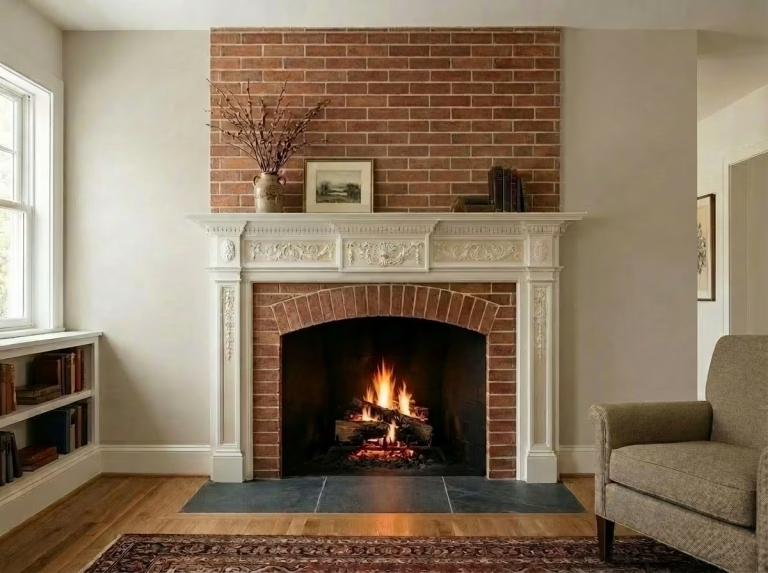
Can Brick Tile Be Used on Wood-Stove and Fireplace Walls? A Heat-Resistance and Installation Guide for Cement-Based Brick Tile and Manufactured Stone Veneer

The Role of Adhesive Curing Accelerators and How to Choose One | Winter Tile Installation Measures
CONTACT
General Inquiries